Long time Server admins usually aren't fans of automatically installing updates on production systems. However, it may be a good idea on workstations or on closely monitored servers. It can save you some time, keep the system vulnerabilities down, and kill bugs fast. In this Linux quick tip we will discuss configuring your system to automatically install updates using DNF package manager.
The DNF package manager provides a timer unit that will do this for you. All you need to do is install, configure, and enable it. If you are unsure of what a timer unit is, read "Using systemd timer units to schedule jobs". Let's install, configure, and enable the dnf-automatic.timer unit to install updates automatically.
Install and Configure the dnf-automatic Package
Let's use DNF to install the package.
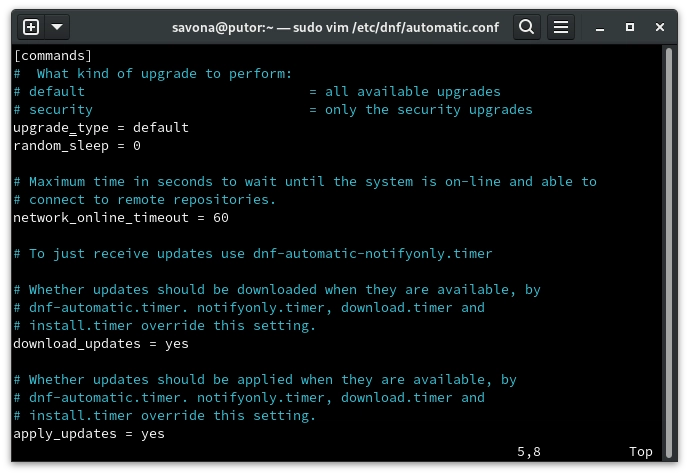
[savona@putor ~]$ sudo dnf install dnf-automaticNow that we have the package installed, let's edit the main configuration file. The file is located at /etc/dnf/automatic.conf and is well commented. There are two important parts of the config file I would like to discuss. The first is the upgrade type. If you are doing this on a production server it might be a good idea to configure it for security upgrades. Meaning it will only update packages that are necessary for security (patching vulnerabilities). This will ensure your services stay working as expected. If you are doing this on a workstation, then it is completely up to you.
The second is the apply_updates option. This is set to no by default. So updates will download, but not install. If you want your updates to be automatically installed, then you MUST set this to yes.

In the above configuration I have the update_type set to default, and apply_updates set to yes. I have now configured my system to automatically install updates. All that is left to do is to start and enable the timer unit.
NOTE: If you are automatically installing updates on a production system you should configure notifications. There are 3 types of notifications you can set. Stdio, email, or you can set the motd (message of the day). All of these options can easily be set in the config file. Just make sure you have your system configured to send email if you choose email.
Starting and Enabling the dnf-automatic Timer Unit
Now that we have our configuration set, let's start and enable the timer unit. We can do this using systemctl just like we would any other service.
Start the timer unit:
[savona@putor ~]$ sudo systemctl start dnf-automatic.timerEnable the timer so it runs at boot:
[savona@putor ~]$ sudo systemctl enable dnf-automatic.timer
Created symlink /etc/systemd/system/timers.target.wants/dnf-automatic.timer → /usr/lib/systemd/system/dnf-automatic.timer.
That's it! The dnf-automatic unit will now take care of automatically installing updates on your system.
Resources and Links
Join Our Newsletter
Categories
- Bash Scripting (17)
- Basic Commands (51)
- Featured (7)
- Just for Fun (5)
- Linux Quick Tips (98)
- Linux Tutorials (65)
- Miscellaneous (15)
- Network Tools (6)
- Reviews (2)
- Security (32)
- Smart Home (1)

